Basic Overview

Timeline view
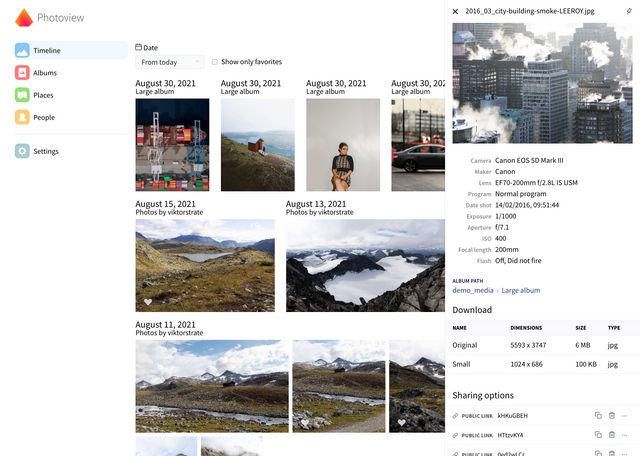
After logging in to Photoview, you will see all of your photos in reverse time order with the newest ones first and the oldest ones at the bottom. The photos are grouped by the day they were taken. This is called the timeline view and you can always return to this view by clicking the top-most icon on the panel at the left of the screen.
At first, it seems that there are only a few rows of photos when you scroll down, but Photoview will fill the webpage with more and more photos when you continue to scroll down.
You can choose if you want to see all of your timeline, or if it should start from a particular point in time. You choose the time period by selecting the appropriate starting point in the drop-down box at the top left of the photos, marked "Date".
In Timeline view you can do the following:
- Click on a photo to display a large version of that photo. From there you can display the next photo (moving down in the timeline) by clicking on the right arrow, or display the previous photo (moving up in the timeline) by clicking on the left arrow. There is an "X" in the top left of the photo. Clicking this takes you back to the timeline view.
- Click on the heart. Placing the mouse cursor over the photo, you will see two symbols: In the bottom-left of the photo is an outline of a ♥ and in the upper-right there is an ⓘ. Clicking the ♥ outline changes it to a solid ♥ to indicate that the photo is one of your favorites. On the top of the screen, there is a
checkboxwith the text Show only favorites next to it, and checking it will only show the photos that you have marked with the ♥. - Click on the ⓘ to open up a panel on the right side of the screen where you can see some metadata for that photo, such as when the photo was taken, with which camera, its exposure settings, etc. It also shows the path to the album/folder where the photo is stored. Clicking on the album path allows you to see all the photos from that album. Furthermore, you can also see which faces that have been identified and the location where it was taken (if known). At the bottom of the panel, you have the option to download this photo to your computer or create a link that can be shared with others. More on that in Share Albums and Media.
Left-hand navigation panel
On the left-hand side of the screen, you have more options for how to view your photos. These are:
Timeline - covered above.
Albums - allows you to view all photos that reside in an album on your server. In Photoview, an album is the same as a folder on your server. This means that you can have as many levels of albums as you wish (only limited by the file system of the server) and they get their names from the names of the folders in your filesystem. When in album view, you can choose the sort order of the photos in the following way:
- By Date shot
- By Date imported
- By Title
- By Kind (photos or videos)
Any of these sort orders can be reversed by clicking the little arrow to the right of the sort-order selection box.
In album view, when you click the ⓘ on the top right of a photo, you have the option to set this photo as the album cover photo of that album. In album view, you will also see a ⚙️ button next right to the name of the album. Clicking this allows you to create a share, essentially a link to that album that you can share with your friends. By copying the link and including it in an e-mail or some other messaging service you can invite your friends to have a look at the photos in that album. You can also choose to download the album to the computer you are using to view the photos. You have the option to download the photos in full resolution or different scaled-down versions.
Places - If this feature was enabled at installation time, this presents you with a map where your photos were taken (provided that they have geocoding information, which they normally have if they are taken with a mobile phone). You can zoom in and out of the map by using the scroll wheel of your mouse. As you scroll in, you can see that the level of information about the location is becoming more and more precise. Clicking one of the pictures allows you to see all the photos from that location, using the left and right arrows to switch between them. For more details, see Places.
People - If enabled at installation time, this presents you with an array of faces that have been identified in your photos. When you start there are no names assigned to the faces, this is something that you have to do. For more details click People.
Settings - The last button is for changing some settings, such as adding more paths to libraries of photos that you want Photoview to present. Note that these paths have to be accessible to Photoview, and if you installed Photoview as a Docker container, the libraries would have to be visible inside the container. This is normally done through Docker Volumes. You can read more about all settings on the Settings Page.